오류처리는 애플리케이션 개발에 있어서 매우 큰 부분을 차지합니다.
오류 예측과 예방, 그리고 오류를 빨리 발견하고 고칠 수 있는 것은 개발자의 필수 조건입니다.
ErrorController
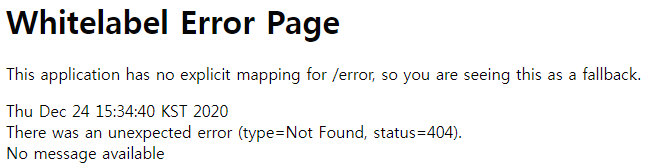
Spring boot에서 별 다른 설정 없이 웹 애플리케이션을 실행한 후 404 Not Found 가 발생하면 아래와 같이 응답합니다.
1. 브라우저에서 호출
2. json 응답
- Content-Type: application/json
{
  "timestamp": "2020-12-24T15:34:44.447+0000",
  "status": 404,
  "error": "Not Found",
  "message": "No message available",
  "path": "/"
}
Spring boot의 기본 오류 처리 properties
# 응답에 exception의 내용을 포함할지 여부
server.error.include-exception=false
# 오류 응답에 stacktrace 내용을 포함할 지 여부
server.error.include-stacktrace=never
# 오류 응답을 처리할 Handler의 경로
server.error.path='/error'
# 서버 오류 발생시 브라우저에 보여줄 기본 페이지 생성 여부
server.error.whitelabel.enabled=true
만약, include-exception과 include-stacktrace를 활성화하면 아래와 같이 응답을 받을 수 있습니다.
1. 브라우저에서 호출

2. json 응답
{
"timestamp": "2020-12-24T07:14:31.790+00:00",
"status": 500,
"error": "Internal Server Error",
"exception": "java.lang.NullPointerException",
// trace는 너무 길어서 생략
"trace": "java.lang.NullPointerException\r\n\"
"message": "No message available",
"path": "/ddd"
}
Spring Boot의 기본 오류 처리 - BasicErrorController
Spring Boot는 오류가 발생하면 server.error.path에 설정된 경로에서 요청을 처리합니다. 만약 설정이 되어 있지 않다면 BasicErrorController가 등록되어 해당 요청을 처리하게 됩니다.
BasicErrorController는 대략적으로 아래와 같이 구현되어 있습니다.
@Controller
// Spring 환경 내에 server.error.path 혹은 error.path로 등록된 property의 값을 넣거나
// 없는 경우 /error를 사용
@RequestMapping("${server.error.path:${error.path:/error}}")
public class BasicErrorController extends AbstractErrorController {

  @Override
  public String getErrorPath() {
    return this.errorProperties.getPath();
  }

  // HTML로 응답을 주는 경우 errorHtml에서 응답을 처리
  @RequestMapping(produces = MediaType.TEXT_HTML_VALUE)
  public ModelAndView errorHtml(HttpServletRequest request, HttpServletResponse response) {

    HttpStatus status = getStatus(request);
    Map<String, Object> model =
      getErrorAttributes(request, isIncludeStackTrace(request, MediaType.TEXT_HTML)));

    response.setStatus(status.value());
    ModelAndView modelAndView = resolveErrorView(request, response, status, model);
    return (modelAndView != null) ? modelAndView : new ModelAndView("error", model);
  }

  // HTML 외의 응답이 필요한 경우
  @RequestMapping
  public ResponseEntity<Map<String, Object>> error(HttpServletRequest request) {

    // 실질적으로 view에 보낼 model을 생성
    Map<String, Object> body =
      getErrorAttributes(request, isIncludeStackTrace(request, MediaType.ALL));
    HttpStatus status = getStatus(request);
    return new ResponseEntity<>(body, status);
  }
}
여기서 제일 중요한건 getErrorAttributes() 메서드인데, getErrorAttributes() 메서드는 AbstractErrorController에 구현되어 있습니다.
public abstract class AbstractErrorController implements ErrorController {
  private final ErrorAttributes errorAttributes;

  protected Map<String, Object> getErrorAttributes(HttpServletRequest request,
    boolean includeStackTrace) {

    WebRequest webRequest = new ServletWebRequest(request);
    return this.errorAttributes.getErrorAttributes(webRequest, includeStackTrace);
  }
}
getErrorAttributes()의 내용을 보면 ErrorAttributes의 getErrorAttributes를 호출하는 것을 알 수 있습니다. 별도로 ErrorAttributes를 등록하지 않았다면 String Boot는 DefaultErrorAttribute를 사용합니다.
Custom ErrorAttributes
별도로 에러처리를 하기 위해 개발자가 ErrorAttributes를 개발하여 bean으로 등록하면 BasicErrorController는 해당 ErrorAttributes를 사용합니다. 아래는 임의로 결과값에 "Hello": "World"를 추가한 예제입니다.
@Component
public class CustomErrorAttributes extends DefaultErrorAttributes {
  @Override
  public Map<String, Object> getErrorAttributes
  		(WebRequest webRequest, boolean includeStackTrace)
    {
    Map<String, Object> result =
    		super.getErrorAttributes(webRequest, includeStackTrace);
    result.put("Hello", "World");
    return result;
  }
}
HTML View 연계
Spring Boot에서는 여러 가지 뷰를 사용할 수 있습니다.
- FreeMarker
- Groovy
- Thymeleaf
- Velocity
- JSP
주의사항!!
위에 JSP를 적어놨지만, Spring Boot에서는 공식문서에서도 JSP는 되도록 사용하지 않는 것을 권장합니다.
그 이유는 다음과 같습니다
- Spring Boot의 방향성
- cloud에서 embedded servlet container를 선호
- Undertow는 JSP를 지원하지 않음
- 사용자 정의 error.jsp를 작성해도 오류 처리를 위한 기본 보기가 대체되지 않음
- Spring Boot로 만들어진 웹 애플리케이션은 war가 아닌 jar로 export 할 수 있는데, jar로 export 했을 경우 jsp는 지원되지 않음
여기에서는 Thymeleaf를 사용해서 view를 만들어보겠습니다.
Thymeleaf을 사용하여 404 view 만들기
1. gradle을 사용할 경우 build.gradle에 아래와 같이 의존성 추가
compile('org.springframework.boot:spring-boot-starter-thymeleaf')
2. application.properties 에 아래 내용 작성
spring.thymeleaf.prefix=classpath:templates/
spring.thymeleaf.check-template-location=true
spring.thymeleaf.suffix=.html
spring.thymeleaf.mode=HTML5
spring.thymeleaf.cache=false
spring.thymeleaf.order=0
1.1 만약, 별도의 컨트롤러를 만들어서 다양한 컨트롤을 하고 싶다면 application.properties에서 spring.thymeleaf.prefix를 삭제하고, 아래와 같이 컨트롤러를 만들면 됩니다.
import org.springframework.http.HttpStatus;
import org.springframework.ui.Model;
import org.springframework.web.bind.annotation.ControllerAdvice;
import org.springframework.web.bind.annotation.ExceptionHandler;
import org.springframework.web.bind.annotation.ResponseStatus;

@ControllerAdvice
public class CustomErrorController {
  @ExceptionHandler(Throwable.class)
  @ResponseStatus(HttpStatus.NOT_FOUND)
  public String exception(final Throwable throwable, final Model model) {
    String errorMessage =
    		(throwable != null ? throwable.getMessage() : "Unknown error");
    model.addAttribute("errorMessage", errorMessage);
    return "error";
  }
}
3. resources/templates/error/404.html을 아래와 같은 내용으로 생성
<!DOCTYPE html>
<html lang="ko" xmlns:th="http://www.thymeleaf.org">
<head>
    <meta http-equiv="Content-Type" content="text/html; charset=UTF-8">
    <title>Test Error Page!</title>
    <link rel="stylesheet" th:href="@{/css/style.css}"/>
</head>
<body>
<div class="errorPage"><span class="errorHead">Error!</span><br/>
    <p th:text="${'path: ' + path}"></p>
    <p th:text="${'status: ' + status}"></p>
    <p th:text="${'timestamp: ' + timestamp}"></p>
    <p th:text="${'error: ' + error}"></p>
    <p th:text="${'errors: ' + errors}"></p>
    <p th:text="${'exception: ' + exception}"></p>
    <p th:text="${'message: ' + message}"></p>
    <p th:text="${'trace: ' + trace}"></p></div>
</body>
</html>
[참고]
에러 뷰에서 다음 오류 속성을 표기할 수 있도록 제공합니다.
- timestamp: 오류 발생 시간
- status: HTTP 상태 코드
- error: 오류 발생 이유
- exception: 예외 클래스 이름
- message: 예외 메시지
- errors: BindingResult 예외로 발생한 모든 오류
- trace: 예외 스택 트레이스
- path: 오류가 발생했을 때 요청한 URL 경로
'웹 개발' 카테고리의 다른 글
| Java - Convert LocalDate to LocalDateTime (0) | 2020.12.25 |
|---|---|
| Spring Boot에서 undertow 사용하는 방법 (0) | 2020.12.25 |
| spring boot에서 jsp 사용하기 (0) | 2020.12.21 |
| spring boot에서 외부라이브러리(jar) 추가 방법 (0) | 2020.12.21 |
| HTML, JSP에서 브라우저 캐시 사용하지 않는 방법 (0) | 2020.12.20 |
