1. OAuth2란?
OAuth2(Open Authorization, Open Authentication 2)는 인증을 위한 개방평 표준 프로토콜입니다.
이 프로토콜은 Third-Party 프로그램에게 리소스 소유자를 대신하여 리소스 서버에서 제공하는 자원에 대한 접근 권한을 위임하는 방식을 제공합니다.
구글, 페이스북, 카카오, 네이버 등에서 제공하는 로그인 기능도 OAuth2 기반의 사용자 인증을 제공하고 있습니다.
2. OAuth2 용어 정리
| Resource owner(자원 소유자) |
| Resource server(구글, 페이스북, 카카오 등)의 계정을 소유하고 있는 사용자를 의미합니다. |
| Client |
| 구글, 페이스북, 카카오 등의 API 서비스를 이용하는 제 3의 서비스 |
| Authorization Server(권한 서버) |
| 권한을 관리해 주는 서버, Access Token, Refresh Token을 발급, 재발급 해주는 역할을 합니다. |
| Resource Server |
| OAuth2 서비스를 제공하고, 자원을 관리하는 서버입니다. |
| Access Token |
| Authorization Server로 부터 발급 받은 인증 토큰, Resource Server에 전달하여 서비스를 제공 받을 수 있습니다. |
3. OAuth2 인증 과정
OAuth2의 인증방식은 크게 4가지가 있습니다.
- Authorization Code Grant: 권한 부여 승인 코드 방식
- 권한 부여 승인을 우해 자체 생성한 Authorization Code를 전달하는 방식이며, 기본이 되는 방식입니다.
- Implicit Grant: 암묵적 승인 방식
- 자격증명을 안전하게 저장하기 힘든 클라이언트(ex: JavaScript 등의 스크립트 언어를 사용한 브라우저)에게 최적화된 방식입니다.
- 암시적 승인 방식에서는 권한 부여 승인 코드 없이 바로 Access Token이 발급 됩니다. Access Token이 바로 전달되므로 만료기간을 짧게 설정하여 누출의 위험을 줄일 필요가 있습니다.
- Refresh Token 사용이 불가능한 방식이며, 이 방식에서 권한 서버는 client_secret를 사용해 클라이언트를 인증하지 않습니다. Access Token을 획득하기 위한 절차가 간소화되기에 응답성과 효율성은 높아지지만 Access Token이 URL로 전달된다는 단점이 있습니다.
- Resource Owner Password Credentials Grant: 자원 소유자 자격증명 승인 방식
- 간단하게 User name, password로 Access Token을 받는 방식입니다.
- 클라이언트가 타사의 외부 프로그램일 경우에는 이 방식을 적용하면 안됩니다. 자신의 서비스에서 제공하는 어플리케이션일 경우에만 사용되는 인증 방식입니다.
- Refresh Token의 사용도 가능합니다.
- Client Credentials Grant: 클라이언트 자격증명 승인 방식
- 클라이언트의 자격증명만으로 Access Token을 획득하는 방식입니다.
- OAuth2의 권한 부여 방식 중 가장 간단한 방식으로 클라이언트 자신이 관리하는 리소스 혹은 권한 서버에 해당 클라이언트를 위한 제한된 리소스 접근 권한이 설정되어 있는 경우 사용됩니다.
- 이 방식은 자격증명을 안전하게 보관할 수 있는 클라이언트에서만 사용되어야 하며, Refresh Token은 사용할 수 없습니다.
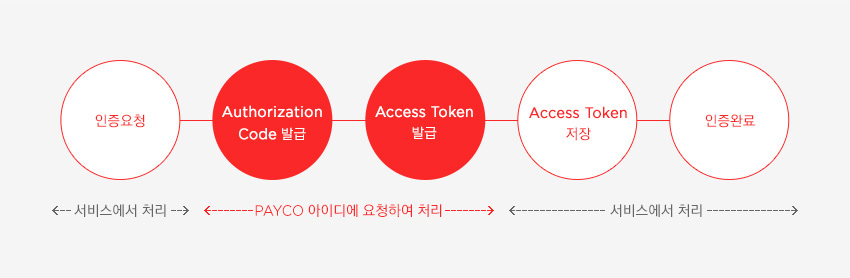
아래 과정은 대표적으로 가장 많이 사용되는 Authorization Code Grant 방식입니다.
이미지의 출처는 PAYCO 개발자 사이트 입니다.

4. Spring Boot OAuth2
[중요]
구글링을 통해 OAuth2 예제를 찾아보면 똑같이 했는데 안되는 경우가 있습니다. 그 경우에는 Spring boot의 버전을 확인해 보시기 바랍니다.
만약 Spring boot 2.x 버전에서 OAuth2 의존성을 아래와 같이 한다면 더이상 진행이 되지 않습니다.
dependencies {
	compile('org.springframework.security.oauth:spring-security-oauth2')
}
그 이유는 현재 구글링해서 검색되는 많은 자료는 Spring boot 1.x의 자료인데, Spring boot 2.0 이후부터 사용법에 변화가 생겼기 때문입니다. 대표적으로 아래에서 등장할 @EnableAuthorizationServer 어노테이션을 더 이상 지원하지 않습니다.
OAuth 2.0 Support
Functionality from the Spring Security OAuth project is being migrated to core Spring Security. OAuth 2.0 client support has already been added and additional features will be migrated in due course.
If you depend on Spring Security OAuth features that have not yet been migrated you will need to add org.springframework.security.oauth:spring-security-oauth2 and configure things manually. If you only need OAuth 2.0 client support you can use the auto-configuration provided by Spring Boot 2.0. We’re also continuing to support Spring Boot 1.5 so older applications can continue to use that until an upgrade path is provided.(출처)
많은 예제 들을 보면 아래와 같이 디펜던시를 추가하는데
dependencies {
	compile('org.springframework.security.oauth:spring-security-oauth2')
}
아래와 같이 변경해 주셔야 합니다.
repositories {
  mavenCentral()
  maven { url 'https://repo.spring.io/snapshot' }
}

dependencies {
  compile 'org.springframework.security.oauth.boot:spring-security-oauth2-autoconfigure:2.0.1.BUILD-SNAPSHOT'
}
이렇게 변경하면 2.x에서도 1.x에서 만들어 둔 것들이 아무 문제 없이 돌아갑니다.
이유는 autoconfigure가 1.x와의 호환성을 위해 만들어진 것이기 때문입니다.
만약 위와 같이 했는데 java.lang.ClassNotFoundException: javax.xml.bind.JAXBException 오류가 발생한다면 아래와 같이 디펜던시를 추가하면 됩니다.
repositories {
  mavenCentral()
  maven { url 'https://repo.spring.io/snapshot' }
}

dependencies {
  implementation 'org.springframework.security.oauth.boot:spring-security-oauth2-autoconfigure:2.0.1.BUILD-SNAPSHOT'
  implementation group: 'javax.xml.bind', name: 'jaxb-api', version: '2.3.1'
  implementation group: 'com.sun.xml.bind', name: 'jaxb-impl', version: '2.0.1'
}
또는 spring-cloud를 사용할 수도 있는데, 이 경우 spring boot와 spring-cloud의 버전을 잘 맞춰야 합니다.
plugins {
  id 'org.springframework.boot' version '2.3.1.RELEASE'
  id 'io.spring.dependency-management' version '1.0.11.RELEASE'
  id 'java'
}

group = 'com.example'
version = '0.0.1-SNAPSHOT'
sourceCompatibility = '1.8'

configurations {
  compileOnly {
    extendsFrom annotationProcessor
  }
}

repositories {
  mavenCentral()
  maven { url 'https://repo.spring.io/snapshot' }
}

dependencies {
  implementation 'org.springframework.cloud:spring-cloud-starter-security:2.2.5.RELEASE'
  implementation 'org.springframework.cloud:spring-cloud-starter-oauth2:2.2.5.RELEASE'
  implementation 'org.springframework.cloud:spring-cloud-starter-bootstrap:3.0.1'
}

test {
  useJUnitPlatform()
}
여기서 부터 실제 코드 입니다.
4.1 build.gradle 수정
plugins {
  id 'org.springframework.boot' version '2.3.1.RELEASE'
  id 'io.spring.dependency-management' version '1.0.11.RELEASE'
  id 'java'
}

group = 'com.example'
version = '0.0.1-SNAPSHOT'
sourceCompatibility = '1.8'

configurations {
  compileOnly {
    extendsFrom annotationProcessor
  }
}

repositories {
  mavenCentral()
  maven { url 'https://repo.spring.io/snapshot' }
}

dependencies {
	implementation 'org.springframework.security.oauth.boot:spring-security-oauth2-autoconfigure:2.0.1.BUILD-SNAPSHOT'
	implementation group: 'javax.xml.bind', name: 'jaxb-api', version: '2.3.1'
	implementation group: 'com.sun.xml.bind', name: 'jaxb-impl', version: '2.0.1'

	compileOnly 'org.projectlombok:lombok'
	developmentOnly 'org.springframework.boot:spring-boot-devtools'
	annotationProcessor 'org.projectlombok:lombok'
	testImplementation 'org.springframework.boot:spring-boot-starter-test'
	implementation 'org.springframework.boot:spring-boot-starter-web'
	testImplementation 'org.springframework.security:spring-security-test'
}

test {
	useJUnitPlatform()
}
4.2 OAuth2 설정 추가
import org.springframework.context.annotation.Configuration;
import org.springframework.security.oauth2.config.annotation.configurers.ClientDetailsServiceConfigurer;
import org.springframework.security.oauth2.config.annotation.web.configuration.AuthorizationServerConfigurerAdapter;
import org.springframework.security.oauth2.config.annotation.web.configuration.EnableAuthorizationServer;

@Configuration
@EnableAuthorizationServer
public class Oauth2AuthorizationConfig extends AuthorizationServerConfigurerAdapter {
  public void configure(ClientDetailsServiceConfigurer clients) throws Exception {
    clients.inMemory()
        .withClient("testClientId")
        .secret("testSecret")
        .redirectUris("http://localhost:8081/oauth2/callback")
        .authorizedGrantTypes("authorization_code")
        .scopes("read", "write")
        .accessTokenValiditySeconds(30000);
  }
}
4.3 Spring Security Config 설정 추가
import org.springframework.context.annotation.Bean;
import org.springframework.context.annotation.Configuration;
import org.springframework.security.config.annotation.authentication.builders.AuthenticationManagerBuilder;
import org.springframework.security.config.annotation.web.builders.HttpSecurity;
import org.springframework.security.config.annotation.web.configuration.EnableWebSecurity;
import org.springframework.security.config.annotation.web.configuration.WebSecurityConfigurerAdapter;
import org.springframework.security.crypto.password.NoOpPasswordEncoder;
import org.springframework.security.crypto.password.PasswordEncoder;

@Configuration
@EnableWebSecurity
public class SecurityConfig extends WebSecurityConfigurerAdapter {
  @Bean
  public PasswordEncoder noOpPasswordEncoder() {
    return NoOpPasswordEncoder.getInstance();
  }

  @Override
  protected void configure(AuthenticationManagerBuilder auth) throws Exception {
    auth.inMemoryAuthentication()
        .withUser("user")
        .password("pass")
        .roles("USER");
  }

  @Override
  protected void configure(HttpSecurity security) throws Exception {
    security
        .csrf().disable()
        .headers().frameOptions().disable()
        .and()
        .authorizeRequests().antMatchers("/oauth/**", "/oauth2/callback").permitAll()
        .and()
        .formLogin().and()
        .httpBasic();
  }
}
4.4 공통 환경 세팅을 위한 WebMvcConfig 설정
import org.springframework.context.annotation.Bean;
import org.springframework.context.annotation.Configuration;
import org.springframework.security.crypto.factory.PasswordEncoderFactories;
import org.springframework.security.crypto.password.PasswordEncoder;
import org.springframework.web.client.RestTemplate;
import org.springframework.web.servlet.config.annotation.CorsRegistry;
import org.springframework.web.servlet.config.annotation.WebMvcConfigurer;

@Configuration
public class WebMvcConfig implements WebMvcConfigurer {
  private static final long MAX_AGE_SECONDS = 3600;

  @Override
  public void addCorsMappings(CorsRegistry registry) {
    registry.addMapping("/**")
        .allowedOrigins("*")
        .allowedMethods("GET", "POST", "PUT", "DELETE")
        .allowedHeaders("*")
        .allowCredentials(true)
        .maxAge(MAX_AGE_SECONDS);
  }

  @Bean
  public RestTemplate getRestTemplate() {
    return new RestTemplate();
  }

  @Bean
  public PasswordEncoder passwordEncoder() {
    return PasswordEncoderFactories.createDelegatingPasswordEncoder();
  }
}
4.5 1차 테스트
아무 문제 없이 완료 되었다면 아래 URL로 접근 시 로그인 화면이 나옵니다.
아래 사용자 정보로 로그인을 시도합니다.
ID: user / password: pass
이 때, There is no PasswordEncoder mapped for the id "null" 라는 에러메시지가 발생한다면 다음과 같이 SecurityConfig를 수정합니다.
-> password("pass")를 password("{noop}pass")로 변경
import org.springframework.context.annotation.Bean;
import org.springframework.context.annotation.Configuration;
import org.springframework.security.config.annotation.authentication.builders.AuthenticationManagerBuilder;
import org.springframework.security.config.annotation.web.builders.HttpSecurity;
import org.springframework.security.config.annotation.web.configuration.EnableWebSecurity;
import org.springframework.security.config.annotation.web.configuration.WebSecurityConfigurerAdapter;
import org.springframework.security.crypto.password.NoOpPasswordEncoder;
import org.springframework.security.crypto.password.PasswordEncoder;

@Configuration
@EnableWebSecurity
public class SecurityConfig extends WebSecurityConfigurerAdapter {
  @Bean
  public PasswordEncoder noOpPasswordEncoder() {
    return NoOpPasswordEncoder.getInstance();
  }

  @Override
  protected void configure(AuthenticationManagerBuilder auth) throws Exception {
    auth.inMemoryAuthentication()
        .withUser("user")
        .password("{noop}pass")
        .roles("USER");
  }

  @Override
  protected void configure(HttpSecurity security) throws Exception {
    security
        .csrf().disable()
        .headers().frameOptions().disable()
        .and()
        .authorizeRequests().antMatchers("/oauth/**", "/oauth2/callback", "/h2-console/*").permitAll()
        .and()
        .formLogin().and()
        .httpBasic();
  }
}
현재 받아줄 Controller가 없기 때문에 404 에러가 뜹니다. 이 때 당황하지 말고 같은 주소로 다시 들어가면 다음과 같이 접근권한을 물어보는 화면이 표시됩니다.

Approve를 선택 후 Authorize 버튼을 클릭하면 다음과 같이 404 페이지 뒤에 code가 표시됩니다.

authrization_code를 통한 승인 방식은 완료 후에 리다이렉트 주소로 code를 실어 보내주는데 해당 code값으로 api를 호출하여 accessToken을 얻을 수 있습니다.
4.6 토큰정보를 받을 class 생성
import lombok.Getter;
import lombok.Setter;

@Getter
@Setter
public class OAuthToken {
  private String access_token;
  private String token_type;
  private String refresh_token;
  private long expires_in;
  private String scope;
}
4.7 토큰 생성을 확인하기 위한 redirect 주소 처리용 Controller 생성
import com.google.gson.Gson;
import lombok.RequiredArgsConstructor;
import org.apache.commons.codec.binary.Base64;
import org.springframework.http.HttpEntity;
import org.springframework.http.HttpHeaders;
import org.springframework.http.HttpStatus;
import org.springframework.http.MediaType;
import org.springframework.http.ResponseEntity;
import org.springframework.util.LinkedMultiValueMap;
import org.springframework.util.MultiValueMap;
import org.springframework.web.bind.annotation.GetMapping;
import org.springframework.web.bind.annotation.RequestMapping;
import org.springframework.web.bind.annotation.RequestParam;
import org.springframework.web.bind.annotation.RestController;
import org.springframework.web.client.RestTemplate;

@RequiredArgsConstructor
@RestController
@RequestMapping("/oauth2")
public class Oauth2Controller {
  private final Gson gson;
  private final RestTemplate restTemplate;

  @GetMapping(value = "/callback")
  public OAuthToken callbackSocial(@RequestParam String code) {
    String credentials = "testClientId:testSecret";
    String encodedCredentials = new String(Base64.encodeBase64(credentials.getBytes()));

    HttpHeaders headers = new HttpHeaders();
    headers.setContentType(MediaType.APPLICATION_FORM_URLENCODED);
    headers.add("Authorization", "Basic " + encodedCredentials);

    MultiValueMap<String, String> params = new LinkedMultiValueMap<>();
    params.add("code", code);
    params.add("grant_type", "authorization_code");
    params.add("redirect_uri", "http://localhost:8081/oauth2/callback");
    HttpEntity<MultiValueMap<String, String>> request = new HttpEntity<>(params, headers);
    ResponseEntity<String> response = restTemplate.postForEntity("http://localhost:8081/oauth/token", request, String.class);
    if (response.getStatusCode() == HttpStatus.OK) {
      String body = response.getBody();
      System.out.println(body);
      return gson.fromJson(response.getBody(), OAuthToken.class);
    }

    return null;
  }
}
2차 테스트
동일한 URL(https://javaengine.tistory.com/entry/Spring-Boot-Oauth2-–-AuthorizationServer [nalaolla]"> http://localhost:8081/oauth/authorize?client_id=testClientId&redirect_uri=http://localhost:8081/oauth2/callback&response_type=code&scope=read)을 호출하여 인증 완료되면 이번에는 다음과 같은 결과를 볼 수 있습니다.
{
  "access_token": "9220da62-d540-4ac4-b307-39b9bfb8029c",
  "token_type": "bearer",
  "refresh_token": null,
  "expires_in": 29981,
  "scope": "read"
}
만약 2차 테스트에서 1차 때와 같은 There is no PasswordEncoder mapped for the id "null" 라는 에러메시지가 발생한다면 다음과 같이 Oauth2AuthorizationConfig를 수정합니다.
import org.springframework.context.annotation.Configuration;
import org.springframework.security.oauth2.config.annotation.configurers.ClientDetailsServiceConfigurer;
import org.springframework.security.oauth2.config.annotation.web.configuration.AuthorizationServerConfigurerAdapter;
import org.springframework.security.oauth2.config.annotation.web.configuration.EnableAuthorizationServer;

@Configuration
@EnableAuthorizationServer
public class Oauth2AuthorizationConfig extends AuthorizationServerConfigurerAdapter {
  public void configure(ClientDetailsServiceConfigurer clients) throws Exception {
    clients.inMemory()
        .withClient("testClientId")
        .secret("{noop}testSecret")
        .redirectUris("http://localhost:8081/oauth2/callback")
        .authorizedGrantTypes("authorization_code")
        .scopes("read", "write")
        .accessTokenValiditySeconds(30000);
  }
}
5. 컨트롤러를 만들지 않고 Postman으로 할 수도 있습니다.
- URL에 http://localhost:8081/ 입력
- 탭에서 Authorization 선택
- Type을 OAuth 2.0으로 변경

- Configuration Options에서 다음과 같이 입력
- Callback URL: http://localhost:8081/oauth2/callback
- Auth URL: http://localhost:8081/oauth/authorize
- Access Token URL: http://localhost:8081/oauth/token
- Client ID: testClientId
- Client Secret: testSecret
- Scope: read

- Get New Access Token 버튼 클릭
- user / pass 입력해서 로그인
[참고사이트]
https://hue9010.github.io/spring/OAuth2/
Spring Boot 2.x 버전에서 OAuth2가 안될때
Spring Boot 2.x 버전에서 다른 분들의 OAuth2 적용 예제를 따라하다 보면 특정 애노테이션과 클래스가 존재하지 않아 에러가 발생 하는 경우가 있는데 해결 방법을 알아보도록 하자
hue9010.github.io
https://blog.naver.com/mds_datasecurity/222182943542
OAuth 2.0 동작 방식의 이해
OAuth 2.0(Open Authorization 2.0, OAuth2)은 인증을 위한 개방형 표준 프로토콜입니다. 이 프로토...
blog.naver.com
https://javaengine.tistory.com/entry/Spring-Boot-Oauth2-%E2%80%93-AuthorizationServer
Spring Boot Oauth2 – AuthorizationServer
Spring 프레임웍에서 제공하는 Oauth2 프로젝트를 이용하여 Oauth Authorization Server를 구축해 보겠습니다. Oauth Authorization은 클라이언트가 서비스 제공자로부터 회원 리소스를 제공받기 위해 인증 및
javaengine.tistory.com
'웹 개발' 카테고리의 다른 글
| [spring] Json return 시, null 항목 제거하는 방법 (0) | 2022.02.13 |
|---|---|
| [java Spring] RestTemplate SSL ignore (0) | 2022.01.26 |
| HTML CSS에서 font에 테두리(외곽선) 넣기 (0) | 2021.12.19 |
| java에서 logback.xml 경로 변경하는 방법 (0) | 2021.12.18 |
| div(레이어) 밑의 객체를 클릭 가능하게 하는 방법 (0) | 2021.12.18 |
