개요
2단계 인증 (2FA) 은 사용자가 자신이 누구인지 확인하기 위해 두 가지 인증 요소를 제공하는 보안 프로세스입니다.
2단계 인증은 피해자의 비밀번호만으로는 인증 확인을 통과하기에 충분하지 않기 때문에 공격자가 개인의 장치와 온라인 계정에 접근하는 것을 더 어렵게 만드는 추가 보안 계층을 제공합니다.
OTP
OTP란 One Time Password의 약자로, 우리말로 하면 일회용 비밀번호라고 할 수 있습니다. 일회성이라는 특징 때문에 매우 안전한 방법으로 알려져 있으며, 금융권이나 일반 웹사이트 2차 인증 방법으로 많이 활용되고 있습니다.
OTP의 종류는 원리에 따라 S/KEY방식, 시간 동기화 방식 챌린지 응답 방식, 이벤트 동기화 방식 등이 있습니다.
이 중 Google Authenticator(OTP)는 시간 동기화 방식을 사용합니다.
TOTP(Time-based One Time Password)의 원리
많은 사람들이 OTP 기기와 서버가 통신하는 것으로 알고 있지만 착각입니다. OTP 기기와 서버는 같은 알고리즘을 바탕으로 동작할 뿐 서로 통신을 하지 않습니다.서버에서 어떤 알고리즘으로 Key를 생성해주면 그것을 OTP 기기에 입력합니다. 그러면 기기에서는 그 Key를 기준으로 하여 30~60초 마다 계속하여 새로운 일회용 비밀번호를 생성합니다. 그 일회용 비밀번호를 서버로 전송하면 서버에서 그 비밀번호가 맞는지 알고리즘으로 확인하는 방식입니다.
Java로 구현해보기
1. jsp 환경 구성
1.1. build.gradle 구성
이번 예제는 spring boot jsp 환경으로 할 것이기 때문에 다음과 같이 build.gradle을 구성합니다.
plugins {
	id 'java'
	id 'org.springframework.boot' version '3.2.1'
	id 'io.spring.dependency-management' version '1.1.4'
}

group = 'com.example'
version = '0.0.1-SNAPSHOT'

java {
	sourceCompatibility = '17'
}

configurations {
	compileOnly {
		extendsFrom annotationProcessor
	}
}

repositories {
	mavenCentral()
}

dependencies {
	implementation 'org.springframework.boot:spring-boot-starter-web'
	implementation 'org.springframework.boot:spring-boot-starter-tomcat'
	implementation 'org.apache.tomcat.embed:tomcat-embed-jasper'
	implementation 'jakarta.servlet:jakarta.servlet-api'
	implementation 'jakarta.servlet.jsp:jakarta.servlet.jsp-api:3.1.1'
	implementation 'jakarta.servlet.jsp.jstl:jakarta.servlet.jsp.jstl-api'
	compileOnly 'org.projectlombok:lombok'
	developmentOnly 'org.springframework.boot:spring-boot-devtools'
	annotationProcessor 'org.projectlombok:lombok'
	testImplementation 'org.springframework.boot:spring-boot-starter-test'
}

tasks.named('test') {
	useJUnitPlatform()
}
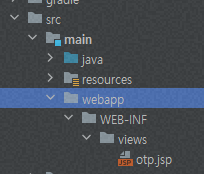
1.2. 폴더 구성
다음과 같이 otp.jsp를 생성합니다.
1.3. application.properties 구성
spring.mvc.view.prefix=/WEB-INF/views/
spring.mvc.view.suffix=.jsp
spring.mvc.static-path-pattern=/resources/**
1.4. Controller 생성
package com.example.demo;

import org.springframework.stereotype.Controller;
import org.springframework.web.bind.annotation.GetMapping;

@Controller
public class OtpController {
  @GetMapping("/otp")
  public String otp() {
    return "otp";
  }
}
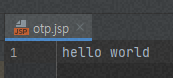
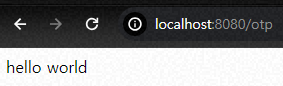
1.5. Hello world 확인
2. OTP 설정 키 생성
OTP를 위해서는 먼저 설정 키(비밀키)를 생성해야 합니다.
2.1. build.gradle
Base나 Hex 포맷 등으로 변환을 지원하는 라이브러리인 common-codec를 설치합니다.
implementation 'commons-codec:commons-codec:1.15'
2.2. 설정 키 생성 함수 추가
import java.security.SecureRandom;
import org.apache.commons.codec.binary.Base32;

public class GoogleOtp {

  /**
   * 비밀키 생성.
   *
   * @return 32자리의 비밀키
   */
  public static String generateSecretKey() {
    SecureRandom random = new SecureRandom();
    byte[] bytes = new byte[20];
    random.nextBytes(bytes);
    Base32 base32 = new Base32();
    return base32.encodeToString(bytes);
  }
}
2.3. Controller
import org.springframework.stereotype.Controller;
import org.springframework.ui.Model;
import org.springframework.web.bind.annotation.GetMapping;

@Controller
public class OtpController {
  @GetMapping("/otp")
  public String otp(Model model) {
    model.addAttribute("key", GoogleOtp.generateSecretKey());
    return "otp";
  }
}
2.4. otp.jsp
<html>
<head>
    <title>Google OTP</title>
</head>
<body>
<h4>KEY : ${key}</h4>
</body>
</html>
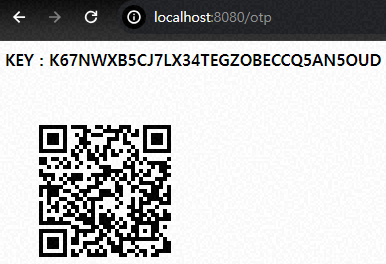
브라우저에서 호출하면 다음과 같이 호출할때마다 비밀키가 변경되는 것을 볼 수 있습니다.

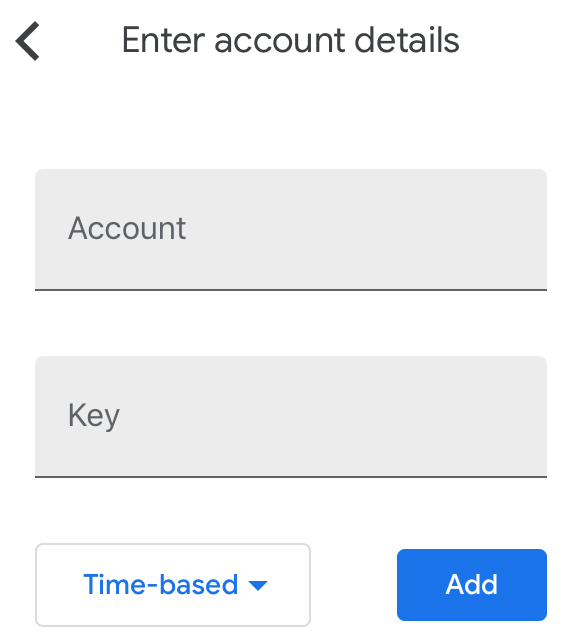
2.5. Google Authenticator에 설정 키 입력
App 실행 후, 오른쪽 하단의 + 버튼을 클릭하면 아래 이미지와 같이 표시됩니다.
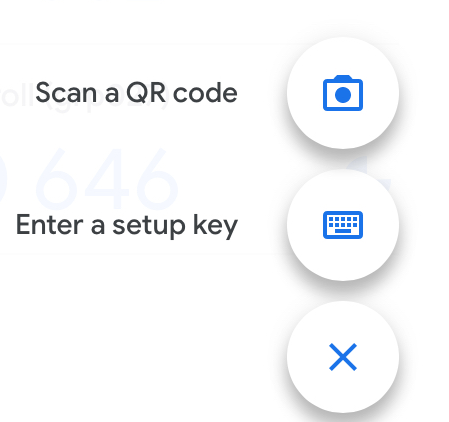
첫번째 칸에는 화면에 표시할 이름을 입력하고 두번째 칸에는 설정키를 입력합니다.
키 유형은 "시간 기준"을 선택합니다.
여기까지 하면 기본적인 OTP 실습은 되지만 뭔가 아쉽습니다.
32자나 하는 비밀키를 일일히 다 입력하기에는 너무 힘이 듭니다.
그래서 Google Authenticator에서는 QR 코드를 통한 키 입력을 제공합니다.
3. QR 코드 생성
3.1. QR 코드 생성을 위해 라이브러리를 추가합니다.
implementation 'com.google.zxing:core:3.5.1'
implementation 'com.google.zxing:javase:3.5.1'
3.2. QR 코드 생성 함수를 추가합니다.
package com.example.demo;

import com.google.zxing.BarcodeFormat;
import com.google.zxing.client.j2se.MatrixToImageWriter;
import com.google.zxing.common.BitMatrix;
import com.google.zxing.qrcode.QRCodeWriter;
import java.io.ByteArrayOutputStream;
import java.net.URLEncoder;
import java.nio.charset.StandardCharsets;
import java.security.SecureRandom;
import java.util.Base64;
import org.apache.commons.codec.binary.Base32;

public class GoogleOtp {

  /**
   * 비밀키 생성.
   *
   * @return 32자리의 비밀키
   */
  public static String generateSecretKey() {
    SecureRandom random = new SecureRandom();
    byte[] bytes = new byte[20];
    random.nextBytes(bytes);
    Base32 base32 = new Base32();
    return base32.encodeToString(bytes);
  }

  /**
   * QR코드 URL 생성.
   *
   * @param displayName 표시할 이름
   * @param secret      비밀키
   * @return QR코드 URL
   */
  public static String getQrCodeUrl(String displayName, String secret)
      throws Exception {
    String format = "otpauth://totp/" + URLEncoder.encode(displayName, StandardCharsets.UTF_8)
        .replace("+", "%20")
        + "?secret=" + secret;
    return generateQRCodeImage(format);
  }

  /**
   * QR코드 이미지 생성.
   *
   * @param barcodeText 바코드 텍스트
   * @return QR코드 이미지
   */
  public static String generateQRCodeImage(String barcodeText) throws Exception {
    QRCodeWriter qrCodeWriter = new QRCodeWriter();
    BitMatrix bitMatrix = qrCodeWriter.encode(barcodeText, BarcodeFormat.QR_CODE, 200, 200);

    ByteArrayOutputStream pngOutputStream = new ByteArrayOutputStream();

    MatrixToImageWriter.writeToStream(bitMatrix, "PNG", pngOutputStream);

    return Base64.getEncoder().encodeToString(pngOutputStream.toByteArray());
  }
}
# 주의사항
1) URLEncoder로 인코딩을 했을 때 공백 문자가 "+"로 변경되는데, "+"가 들어간 QR은 Google Authenticator가 정상적으로 인식하지 못합니다. 따라서 URLEncoder.encode() 한 후에 "+"를 "%20"로 변경해야 합니다.
2) 검색해보면 구글 API를 통해 QR 코드를 생성하는 예제가 있는데 구글 API는 사용하면 안됩니다.
3.3. 컨트롤러에 QR을 추가합니다.
import org.springframework.stereotype.Controller;
import org.springframework.ui.Model;
import org.springframework.web.bind.annotation.GetMapping;

@Controller
public class OtpController {
  @GetMapping("/otp")
  public String otp(Model model) throws Exception {
    String secretKey = GoogleOtp.generateSecretKey();
    model.addAttribute("key", secretKey);
    model.addAttribute("qr", GoogleOtp.getQrCodeUrl("yjh5369", secretKey));
    return "otp";
  }
}
3.4. jsp에 QR을 표시하기 위해 아래와 같이 변경합니다.
<html>
<head>
    <title>Google OTP</title>
</head>
<body>
<h4>KEY : ${key}</h4>
<img src="data:image/jpeg;base64, ${qr}" alt="QR Code">
</body>
</html>
3.5. 브라우저로 접속하여 QR 표시를 확인합니다.
3.6. Google Authenticator를 실행하고 QR을 스캔합니다.
4. OTP 유효성 검사
사용자가 OTP를 입력했을 때 유효성을 검사하는 방법입니다.
4.1. 라이브러리 추가
implementation 'de.taimos:totp:1.0'
4.2. 비교 함수 추가
 /**
   * OTP 체크.
   *
   * @param secretKey 비밀키 (32자리)
   * @param otp       OTP(6자리)
   * @return true: 일치, false: 불일치
   */
  public static boolean checkOtp(String secretKey, String otp) {
    return otp.equals(getOtpCode(secretKey));
  }

  public static String getOtpCode(String secretKey) {
    Base32 base32 = new Base32();
    byte[] bytes = base32.decode(secretKey);
    String hexKey = Hex.encodeHexString(bytes);
    return TOTP.getOTP(hexKey);
  }
4.3. Controller에 /check 추가하고 다음과 같이 변경
import org.springframework.stereotype.Controller;
import org.springframework.ui.Model;
import org.springframework.web.bind.annotation.GetMapping;
import org.springframework.web.bind.annotation.PostMapping;

@Controller
public class OtpController {
  String secretKey = GoogleOtp.generateSecretKey();
  @GetMapping("/otp")
  public String otp(Model model) throws Exception {
    model.addAttribute("key", secretKey);
    model.addAttribute("qr", GoogleOtp.getQrCodeUrl("yjh5369", secretKey));
    return "otp";
  }

  @PostMapping("/check")
  public String check(Model model, String otp) {
    model.addAttribute("result", GoogleOtp.checkOtp(secretKey, otp));
    return "check";
  }
}
4.4. check.jsp 추가
<html>
<head>
    <title>Google OTP</title>
</head>
<body>
<h4>결과 : ${result}</h4>
</body>
</html>
4.5. QR 인식하여 OTP 등록
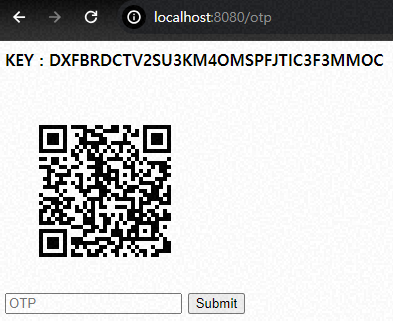
4.6. 브라우저에 접속하여 아래 화면에 OTP 입력 후 submit 버튼 클릭
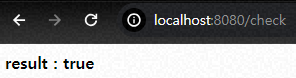
4.7. 아래와 같이 결과가 표시되면 성공
참고
https://5balloons.info/two-factor-authentication-google2fa-laravel-5/
two factor authentication in Laravel
Step by Step Guide to Implement Two Factor Authentication in Laravel 5 ( pragmarx/google2fa) Integration with Laravel 5 Basic Authentication
5balloons.info
Two-Factor Authentication with Java and Google Authenticator
I am more than sure that each of you have at least one account with enabled Two-Factor Authentication (2FA). But if you are still…
medium.com
'back end > java' 카테고리의 다른 글
| Spring Data JPA에서 Insert 전에 select query를 하는 이유 (0) | 2024.02.02 |
|---|---|
| [java] 문자열 자르기 함수 split 함수 사용 시 주의 사항. 문자열 자르는 방법 (0) | 2024.01.17 |
| spring boot session timeout setting (0) | 2023.11.16 |
| [Java] 파일, 폴더(디렉토리) 삭제하는 방법 (0) | 2023.11.09 |
| 파일 조작의 새로운 길, `java.nio.file.Files` vs `java.io.File` (0) | 2023.11.09 |
